

Quick Start
Welcome to the Chargeflow's Public API developer hub. You'll find comprehensive guides and documentation to help you start working with Chargeflow public API as quickly as possible, as well as support if you get stuck. Let's jump right in!
API
Chargeflow provides a REST API that enables you to programmatically view and update data in your Chargeflow account, as well as be notified of events via Webhooks.
Refer to the API reference to see all available endpoints and their usage.
Authentication
Introduction
API Access Key authentication is a commonly used method to authenticate and authorize access to APIs. In this section, we will explain how to use the API Access Key authentication, specifically focusing on the security definitions including the apiKey named x-api-key and x-chargeflow-hmac-sha256 (Hash-Based Message Authentication Code) passed in the header.
Prerequisites
- Chargeflow's API Access Key
- Chargeflow's API Secret Key (If HMAC Signature Validation is enabled)
Steps to obtain API Key Authentication
- Log in to the Chargeflow App
- Navigate to Settings
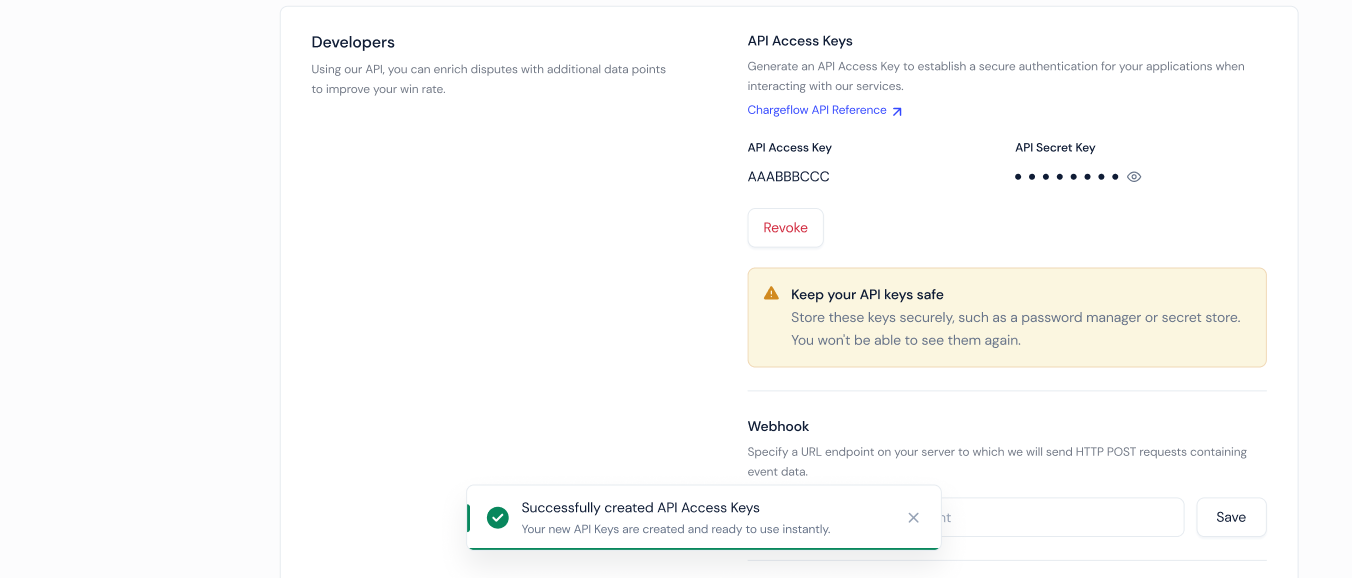
- In "Settings", navigate to Developers from the left side menu.
- Click on the button [Generate Keys]
- You can use the
API Access KeyandAPI Secret Keyto send new requests to Chargeflow's API.
Enforcing HMAC Signature Verification
By default, HMAC signature verification is disabled on newly generated Access Keys.
In this mode, the API requests require only the API Key to be included. This makes use of the API as simple as possible, allowing easy integration in your codebase or even in tools like Zapier or Make.
If you prefer to add an additional layer of security, ensuring data integrity (no tampering) and authenticity (requests come from you), you can enable the HMAC Signature Validation.
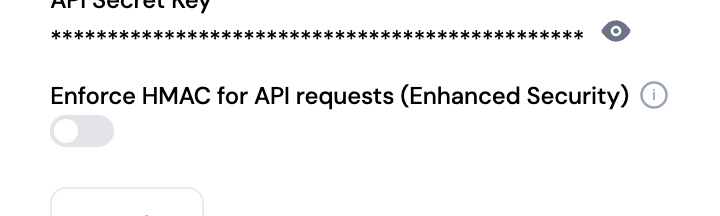
Once enabled, Chargeflow servers will always verify the signature of your requests.
Please read the following sections on how to correctly compute and include the signature.
Steps to generate HMAC
In addition to including the API Key, you also need to generate an HMAC signature (Hash-based Message Authentication Code) for each request. HMAC provides a way to verify both the data integrity and the authenticity of the message. This HMAC will be passed in the x-chargeflow-hmac-sha256 header of the request.
To obtain the HMAC, you will first need the secret key which is provided once when you create a new API access key in Chargeflow Admin UI.
Once you have a secret key, you can use it to sign the request by using an HMAC function with the SHA-256 hashing algorithm to encode the request into a validation hash.
Authentication flow
- Along with the request body, you send headers, containing your API key and signature generated
using your requested data and the Secret key - Chargeflow server receives the request and validates the API key
- Chargeflow server then retrieves your Secret key from its database and generates
a verification signature using HMAC with the same SHA-256 hashing algorithm - If both signatures match, the request is authenticated
Below are NodeJS and Python code examples on how to generate an HMAC signature for your requests.
The HMAC generation differs depending on if you are sending a simple text based (JSON) request or multipart/form-data request with files, such as for the Evidence Upload API.
Requests without body or with JSON payload
const crypto = require('crypto')

// Function to generate HMAC-SHA256 signature
function generateHmacSignature(data, secretKey) {
  const hmac = crypto.createHmac('sha256', secretKey);
  hmac.update(data);
  return hmac.digest('hex');
}

function calculateHmac(method, path, body, secretKey) {
  // Example request data
  const requestData = {
    method: method.toUpperCase(),
    path,
    body,
  };

  // Compose string to sign from request data
  const dataToSign = `${requestData.method}\n${requestData.path}\n${requestData.body}`;

  // Generate HMAC signature
  const hmacSignature = generateHmacSignature(dataToSign, secretKey);
  return hmacSignature;
}

// Example request data
const method = 'POST';
const path = '/public/2024-03-18/disputes/dispute-id/order';
// # Example request body. Work with the same string when sending to ensure that body is sent exactly as signed.
const body = JSON.stringify({ param: 'value' });

// Calculate HMAC signature
const secretKey = 'your-secret-key';
const hmacSignature = calculateHmac(method, path, body, secretKey);

console.log('Generated HMAC-SHA256 Signature:', hmacSignature);

// You can now use the generated signature as the 'x-chargeflow-hmac-sha256' header value
import hashlib
import hmac
import json
# Function to generate HMAC-SHA256 signature
def generate_hmac_signature(data, secret_key):
signature = hmac.new(
bytes(secret_key, 'utf-8'),
msg = bytes(data, 'utf-8'),
digestmod = hashlib.sha256).hexdigest()
return signature
def calculate_hmac(method, path, body, secret_key):
# Example request data
request_data = {
'method': method.upper(),
'path': path,
'body': body,
}
# Compose string to sign from request data
data_to_sign = f"{request_data['method']}\n{request_data['path']}\n{request_data['body']}"
# Generate HMAC signature
hmac_signature = generate_hmac_signature(data_to_sign, secret_key)
return hmac_signature
# Example request data
method = 'POST'
path = '/public/2024-03-18/disputes/dispute-id/order'
# Example request body. Work with the same string when sending to ensure that body is sent exactly as signed.
body = json.dumps({'param': 'value'})
# Calculate HMAC signature
secret_key = 'your-secret-key'
hmac_signature = calculate_hmac(method, path, body, secret_key)
print('Generated HMAC-SHA256 Signature:', hmac_signature)
# You can now use the generated signature as the 'x-chargeflow-hmac-sha256' header valueRequests with binary data (multipart/form-data)
When sending multipart/form-data requests with files, the body to sign becomes a sorted list of key=value pairs joined with ; symbol. The value is an MD5 hash of the contents.
In case of the value being a file, the file is first converted to Base64 representation before hashing.
// Compatible with Node.JS 18+

const crypto = require('crypto');
const fs = require('fs');
const { blob } = require('stream/consumers')

// Function to generate HMAC-SHA256 signature
function generateHmacSignature(data, secretKey) {
  const hmac = crypto.createHmac('sha256', secretKey);
  hmac.update(data);
  return hmac.digest('hex');
}

// Function to create MD5 hash of a FormData part
async function createPartHash(part) {
  const isFile = part instanceof File
  const partString = isFile ? await fileToBase64(part) : part;
  return getMd5(partString);
}

function getMd5(contents) {
  return crypto.createHash('md5').update(contents).digest('hex');
}

async function fileToBase64(file) {
  return Buffer.from(await file.arrayBuffer()).toString('base64')
}

// Function to normalize FormData into a signing string
async function formDataToSignString(formData) {
  const formDataEntries = Array.from(formData);
  const hashedParts = []
  for (const [key, value] of formDataEntries) {
    const partHash = await createPartHash(value);
    hashedParts.push(`${key}=${partHash}`);
  }

  return hashedParts.sort().join(';')
}

// Function to calculate HMAC signature
async function calculateHmacForFormData(method, path, formData, secretKey) {
  const body = await formDataToSignString(formData);

  const requestData = {
    method: method.toUpperCase(),
    path,
    body,
  };

  // Compose string to sign from request data
  const dataToSign = `${requestData.method}\n${requestData.path}\n${requestData.body}`;

  // Generate HMAC signature
  const hmacSignature = generateHmacSignature(dataToSign, secretKey);
  return hmacSignature;
}

async function signRequest() {
  // Example request data
  const method = 'POST';
  const path = '/public/2024-03-18/disputes/dispute-id/order';
  // Prepare FormData, same as when sending a multipart/form-data request
  const formData = new FormData()
  formData.append('description', 'File description')
  formData.append('file', await blob(fs.createReadStream('./foo/bar.jpg')), 'bar.jpg')

  // Calculate HMAC signature
  const secretKey = 'your-secret-key';
  const hmacSignature = await calculateHmacForFormData(method, path, formData, secretKey);

  console.log('Generated HMAC-SHA256 Signature:', hmacSignature);

  // You can now use the generated signature as the 'x-chargeflow-hmac-sha256' header value
}

signRequest()
Updated 10 months ago